Click here to see recipe listing or travel by country

Tuesday, November 20, 2012

German Chocolate Pecan Pie

So, here is my go to pie for Thanksgiving -- German Chocolate Pecan Pie.  HEAVENLY!!!  Pecan pie is so good by itself but the addition of chocolate and coconut really steps it up a notch or five. It is a Rachael Ray recipe that I have changed slightly.  The original recipe calls for 3/4 cup of chocolate chips and (I can't believe I'm writing this) it's a little too chocolatey.  I know, it's hard to believe that I think something could have too much chocolate but it's true.  I also usually just use 2 cups of pecans because that's the size bag I find in my grocery stores.  It makes the perfect amount of filling for the pie so I really don't think it's missing anything by having half a cup less of pecans.  This is a really easy recipe - my four year old helps with the filling.  I usually cheat and buy a pre-made shell so the whole thing takes about 45 minutes.  I do pre-bake the shell for about 10-12 minutes before filling it.  So, that's it - the recipe to the most amazing delicious pie ever.

Pre-made pie shell
5 tablespoons unsalted butter
1/2 teaspoon salt
2 large eggs
1/2 cup dark brown sugar
1/2 cup light corn syrup
2 cups pecan pieces
3/4 cup sweetened flake coconut
1/2 cup semisweet chocolate chips

Preheat oven to 375 degrees and bake for pie shell 10- 12 minutes. In a medium bowl, whisk the eggs. In a heavy, medium saucepan, whisk together the  butter and 1/2 teaspoon salt with the brown sugar and corn syrup over medium heat until melted and smooth. Whisk the sugar mixture into the beaten eggs. Stir in the nuts and coconut. Put the chocolate chips in the pie shell. Pour in the filling and bake until set, about 25 minutes. Let the pie cool completely before slicing.


Happy Thanksgiving everyone!

Monday, October 29, 2012

Chocolate Chip Banana Bread

I had some banana's that were getting pretty ripe so I decided to make up a quick batch of banana bread.  I happen to have some chocolate chips on hand, so of course I had to add them!  Here is what I used...


1 cup flour
1 Tbsp baking powder
1/2 tsp baking soda
1/8 tsp salt
4 medium overripe bananas, mashed
1/4 cup sugar
1 large egg
1/4tsp cinnamon (or to taste)
1/2 tsp vanilla extract
1/4 cup olive oil
1/4 cup chocolate chips

First, preheat the oven to 350 degrees and grease loaf pan (or muffintin, if you prefer)
In a large bowl, combine banana, sugar, egg, vanilla and oil.  Mix well. Use a small mesh colander and sift the flour, baking powder, baking soda andsalt on top of the wet ingredients and then stir to combine. This will save you from dirtying a second bowl. Fold in the chocolate chips.

Pour the batter into prepared loaf pan (or muffin cups). Bake until a toothpick inserted in the center of a bread comes out clean. It took me about 45 minutes.  Muffins will bake faster.  Letcool before serving.

This was pretty delicious. I topped it with some homemade whipped cream.   I think next time I'll add a little homemade almond butter to the mix because what could possibly be better than almond butter, banana, and chocolate???

Enjoy

Tuesday, October 23, 2012

Pumpkin Pie from a pumpkin...who would of thought?

We went to a pumpkin patch this weekend and had a wonderful time there.  We have taken our daughter every year since she was a year old.  We always go, let her play, and end the day with picking out pumpkins - one for display and one tiny one for her room.  This year, we decided to buy a third pumpkin for a pumpkin pie.  Okay, really my husband came up with the idea, and I just went along with it. For pumpkin pies, you should buy a sweet pumpkin like the sugar (or sugar pie) pumpkin.

So, after much research online, I ended up combining a few recipes and here is what I came up with -


2 cups fresh pumpkin puree
1/4 teaspoon nutmeg
dash pumpkin pie spice
1/2 teaspoon ground ginger
1/2 teaspoon ground cinnamon
1 teaspoon salt
4 eggs (lightly beaten)
1 cup honey
1/2 cup milk
1/2 cup heavy whipping cream

First, to roast the pumpkin, I cut it in half, scooped out the seeds and lightly oiled it.  I placed it on a baking sheet lined with foil and lightly oiled, cut side down and let it bake at 325 degrees for about 50 minutes.  Bake it until a it is tender when you put a fork in it. Next time, I think I will cut the pumpkin into several smaller pieces so that they cook a little faster and more evenly.


After it's done, let it cook slightly and then scoop out all the pumpkin flesh - and discard the shell.  Puree the pumpkin until smooth.  You can use a hand blender, regular blender or food processor.


Next, add the spices and salt then beat in the eggs, honey, milk and heavy whipping cream. Actually, my daughter did this part - she does love to help out in the kitchen.

  Pour into a  pie shell and bake 55 minutes, or until firm. Oh, and I totally cheated and used a pre-made pie shell.  For Thanksgiving, I'll go all out and make a homemade one but this is just a tester.

I also made chantilly cream (aka homemade whipped cream) to top the pie with - using a cup of heavy cream, 3/4 teaspoon of vanilla extract and a tablespoon of sugar.

Oh, and the great thing about roasting your own pumpkin is that you have plenty of leftovers and you can freeze them in one cup servings in plastic freezer bags like this -

AND, you can dry out your pumpkin seeds and roast them for a delicious snack 


Tuesday, October 16, 2012

Spinach and Feta Stuffed Chicken

Spinach, feta cheese, chicken and bacon...heaven!!!  This is a really good dish!  I served it with quinoa and the rest of the spinach stuffing.  Delicious, quick, and easy.

First I made the filling (actually my daughter helped out quite a bit with the filling) - 6oz plain greek yogurt, 6oz crumbled feta cheese, 12oz bag of spinach (thawed and drained), 3 cloves of minced garlic and half a small onion diced. Next, I butterflied the chicken breasts, seasoned with salt and pepper and added the stuffing to middle and closed it back up.  I then let my daughter wrap a slice of bacon around the chicken and then I secured it with a toothpick.  Once all four breasts were stuffed, I mixed 3 tablespoons of fresh lemon juice with 3 tablespoons of olive oil then added seasonings - salt, pepper, oregano, basil to taste.  My daughter brushed the mixture over the breasts and then I popped it in a 375 degree oven for about 45 minutes.  I had quite a bit of leftover spinach mixture so I put it in a small dish, topped it with bread crumbs and parmesan cheese and baked it the last 30 minutes of cook time.  While everything was in the oven, I made some quinoa on the stovetop.  Easy peasy.  Really good flavor on everything.  The chicken was nice and moist and the stuffing was yummy.  And of course, you can never go wrong with BACON!  


Friday, September 21, 2012

Baked Chicken with Eggplant, Zucchini, & Tomato Ragout

I  had to come up with something relatively quick for dinner last night because my daughter had ballet/tap class in the afternoon and I didn't have a lot of time for dinner.  This is what I came up with - baked chicken with eggplant, zucchini, & tomato ragout, quinoa, and mixed greens salad with tomatoes, avocado and goat cheese.

For the chicken dish, I first diced the (1) eggplant, (1/2)onion, (2 cloves) garlic, (2 small) zucchini, and (4) roma tomatoes.


Next, I seasoned 4 chicken breasts (cut in half) with salt and pepper.  I heated an oven safe pan over high heat and added enough olive oil to cover the bottom of the pan.  Once the oil was hot, I added the chicken breasts and browned (5-6 minutes) each side.


I then removed the chicken, added the eggplant, a couple springs of rosemary and thyme, onion and a little more oil.  I lowered the heat a little and let that cook until the onions were translucent.  I then added the zucchini and half a cup of white wine.


Once the wine reduced by half, I added the tomatoes and some salt and pepper.  I then placed the chicken on top of the veggies and put the whole thing in the oven until the chicken was cooked through (about 15 minutes, but check the temp to make sure it's 160). I also poured myself a glass to drink while I finished preparing dinner.  (can't let it go to waste!)

Once the chicken was cooked, I removed it from the oven and let it rest for about 5 minutes.

I also prepared quinoa and salad to go with dinner while the chicken and ragout was cooking.  Here is the finished plate - not bad for a quick weeknight meal.

Thursday, September 20, 2012

Cedar Plank Salmon, Mushroom Risotto, & Green Beans with Caramelized Shallots

My aunt and uncle have been visiting us for the past fews days and last night was our last meal together before they had to head back to Illinois.  We made cedar plank salmon on the grill, mushroom risotto and green beans with caramelized shallots.  We also had a lovely bottle of Parsonage Chardonnay that my aunt picked up during our wine tasting trip to Carmel Valley.

As grillmaster, my husband was charged with preparing the salmon, which he placed on cedar plank that had been soaked in water.  He simply dressed it with salt, pepper and lemon juice and lemon slices.  We ran out of propane and had to finish the cooking process by broiling it for a second.  They came out perfectly - nicely flaky with a yummy cedar and lemon flavor.  Well done honey, well done!

I made mushroom risotto by first sauteing 2oz of diced onions with 2 cups of mushrooms in a tablespoon each of oil and butter.  After they cooked for a few minutes, I added the arborio rice and stirred well then added 2 oz of white wine.  Once the wine cooked down, I added a ladle of warmed chicken stock.  At this point, I just let the stock cook until almost gone, then add another ladle at a time and repeat until the rice was done (about 25 minutes).  I finished it off with a tablespoon of butter and an ounce of shredded Parmesan.

I also prepared green beans with caramelized shallots.  I did most of the work on this dish about an hour before I started the risotto.  I blanched the green beans in boiling, heavily salted water for about 5-6 minutes, then moved them to a bowl of ice water.  I drained them and them placed them in the fridge until time for dinner.  I then thinly sliced about 5 or 6 shallots and heated a pan with a tablespoon of butter.  Once the pan was nice and hot, I sauteed the shallots for about a minute and then lowered the heat and let the shallots caramelize.  It took about 20 minutes or so.  The trick is not to stir the shallots too frequently or else they don't have time to get that beautiful brown color and yummy taste.  When the risotto was almost done, I heated the caramelized shallots back up with a tablespoon of butter and then added the green beans and heated through.

I also made a quick salad of mixed greens, tomatoes, avocado, herbs from my back yard (rosemary and parsley) and salt and pepper.

It was such a great meal and great end to our wonderful visit!  We were all sad to say goodbye but we will cherish our memories from their visit.  We look forward to their next visit to us, after we move to Rio.


Monday, September 17, 2012

Wonderful time in Watsonville

It's been a wonderful weekend!  We have a aunt and uncle visiting us for a few days and have had a wonderful time showing them Monterey and all our favorite places.  We were also fortunate enough to catch up with an old friend this weekend.  He invited the lot of us (5 all together) to his family's home in Watsonville. This home is amazing and I wish I had more photos to share.  This house has been in our friends family for 5 generations!!  It is on a gorgeous piece of land and is home to an amazingly kind and generous family.

When we first arrived, we were given a quick tour of the property - the beautiful rose garden, the gorgeous flowers and plants and the redwoods.  Gorgeous, gorgeous, gorgeous!!!

Next, we grabbed some bowls and headed down the road to pick blackberries!  My daughter loved it until she discovered the first thorn and then she decided to stick with picking flowers (aka weeds).  After the group of us (our 5 plus another couple and our dear friend) finished with picking berries we headed back to the house for some snacks and drinks.  We had nice, cold Pinot Grigio and some yummy Meunster cheese, fresh raspberries, raw peas and carrots, crackers and hummus. We spent some time catching up with old friends and making new ones, while sitting on the back porch taking in the beautiful surroundings.  There was also a trip down to see the goats and chickens and to collect some eggs.  It was a lovely time!

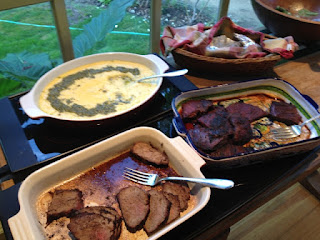
Next, it was time for dinner.  Oh my, can this lady cook!!!!  We had the most delicious creamy polenta (drizzled with pesto), barbequed tri tip and skirt steak, salad and dessert.


Oh dessert was heavenly!  She took our blackberries and made a wonderful blackberry crisp that was to die for!!! There was also apple pie but I only had eyes for the blackberries.


Unfortunately, after dinner we had to load back into the car and head home - work and school Monday morning.  We have a couple more days with our family and then they will be leaving us too.  It's been a great few days and while I'm so happy to have spend such a wonderful time with both friends and family, it's always sad to say goodbye to them!

Wednesday, September 12, 2012

Hummus- a jack of all trades

I love hummus! I could probably eat it every day of my life and not get bored with it.  It can be used in so many different ways.  It's great as a condiment on sandwiches (SO much better than mayo or mustard), it's good mixed into scrambled eggs, and of course as a dip for crackers, chips, carrots, broccoli, celery, any veggie really.  Oh, and I also LOVE it with grilled meats- chicken, beef, lamb...YUM!


I start with a basic recipe and then just experiment. For the basic recipe, I use two cans of garbanzo beans (drained and rinsed), 1/3 cup of tahini, juice of two lemons, 2-4 cloves of garlic, a tablespoon of cumin, salt and pepper and about a 1/3 cup of olive oil.  I put everything in the food processor except the olive oil.  While the processor is going, I add the oil to it.  That's the basic recipe.  Now, from here I start tasting (big delicious spoonfuls) and add whatever else I have lying around.  Today I added chipotle seasoning and Hungarian paprika because I was feeling a little spicy :)  Sometimes I just add extra lemon or extra garlic.  I've also made a nice batch with roasted red bell pepper.  One day, I'm going to take the time to caramelize some shallots and throw in but haven't gotten around to that yet.

Before serving it, I drizzle a little more olive oil on top and dust with paprika.  Yummy and delicious and so very easy!

Friday, September 7, 2012

Apple pecan stuffed Cornish hens with roasted cauliflower and couscous

Last night I made frozen pizza for dinner so out of guilt, I had to make a nice dinner tonight.  I decided on Cornish game hens with roasted cauliflower (purple because it's my daughters favorite color), couscous and salad.  For the stuffing, I diced a leek and two stalks of celery and sauteed it in olive oil for about 5 minutes.  Next, I added a diced Granny Smith apple, 1/4 teaspoon fennel seed, 1/2 teaspoon of salt and 1/4 teaspoon of pepper.  I let that cook a couple more minutes and and then added a tablespoon of apple cider vinegar and a tablespoon of chopped pecans and removed it from the heat.


Next, I got the butter ready - a tablespoon of softened butter mixed with 2 tablespoons of chopped dried cherries, mixed together to form a paste.


My sous chef (taking notes on her 'recipes')

Then came the fun part - letting my daughter stuff the hens!


She stuffed the two hens and we had a bit of leftover stuffing (I used the leftover stuffing in the couscous, yummy). I rubbed the cherry butter under the skin of the breasts and on the outside of the hens and put them in a 400 degree oven and let them cook about an hour (until they were 165 degrees). I let them rest for 5 minutes and then served them up.

While the hens were roasting, I tossed the purple cauliflower with salt, pepper and garlic powder and drizzled them with olive oil.  I threw them in the oven and let them cook the last 20 minutes.  I also made the couscous and added the leftover apple pecan stuffing to it.  Really great meal!

Tuesday, September 4, 2012

I want my baby back, baby back, baby back RIBS!

Isn't this a beautiful sight?
Here is a great meal to make on a weekend when you have a little more time. I prepared everything the same day but you can make the barbecue sauce and marinate the ribs overnight, splitting up the amount of time/work over two days.  For the sauce, I combined:
1 cup ketchup
1 cup of white vinegar
1/2 cup dark corn syrup
1 teaspoon sugar
1 teaspoon salt
1/4 teaspoon each of - garlic powder and onion powder
and brought it to a boil then reduced it to a simmer and allowed it to cook for about 45 minutes (stirring occasionally).  Once it gets nice and thick, it's done.


 I then took about 4 1/2 lbs of ribs and cut them up into several 
portions (6 ribs per portion), I coated each portion of ribs with barbecue sauce and wrapped them tightly in foil.  Once they were all wrapped up, I let them sit in the frigde for a few hours (overnight is best but I was not that prepared).  I then placed them on baking sheets in a preheated 300 degree oven and let them cook low and slow for about 2 hours and 15 minutes.  These ribs will make your whole house smell AMAZING!!!  Meanwhile, I had my husband (because he's the grill master at our house) heat the grill up and start the corn.  When the ribs were done in the oven, I removed them from the foil, brushed them with more barbecue sauce and put them on the grill for a couple minutes on each side.  Best. Ribs. Ever!

To accompany the corn, I roasted a jalapeno (seeded and ribs removed) on the grill, then diced it up and added it a softened stick of butter, added the juice of lime and rolled it up plastic wrap until hardened. Yummmm!


I also made some southwestern corn muffins (from a mix), a salad (from all the veggies I had in my fridge) and some baked potato fries (from a bag).  This meal was so delicious my daughter asked for it breakfast the next day :)

Friday, August 24, 2012

Split Pea Soup for this Fall-like weather

I usually don't make soups in the middle of summer because I think it's too hot for such a dish. My mother, on the other hand, thinks it's completely normal to make a hot, spicy chili to eat on a hot, humid night in July.  It's a matter of opinion (and mines the right one ;)

In Monterey, even though the rest of the country is going through extremely hot temps, it's still in the 50's and 60's most days.  So, I decided a nice, big pot of split pea soup would be a perfect dinner this week.  Now, my husbands family has a thing about serving cheese and slices of summer sausage and crackers with soup, so I also prepared a nice appetizer platter to accompany the soup.

I first soaked the split peas overnight. Some say they don't require soaking but I did it anyways.  Your choice to soak or not to soak.  I started the soup by draining the water and filling up a big pot with the peas, two large ham hocks, two onions (thinly sliced), and some seasonings (salt, pepper and marjoram, to taste).  I covered it with chicken stock (you can use water but it won't be as good). I brought it to a boil and reduced to a simmer and let it cook for about an hour and a half.  I then added a diced potato, three diced carrots and three stalks of diced celery. I let it cook until the veggies were done (about 40 minutes). Pretty easy.

While the soup was cooking, I make the appetizer platter.  I bought a nice smoked Gouda and a Chianti salami from Trader Joes.  I also had some sourdough bread that we bought in San Francisco, so I thawed that out and popped it in the oven long enough to warm it up.  I used these awesome little dishes that I bought in Qatar and filled them with almonds, crackers, and an Italian olive spread. I added some grapes to the platter to finish it off.  Served it with some yummy Sierra Nevada Torpedo IPAs.

Perfect meal for this weather!


Friday, August 10, 2012

Mediterranean Chicken


I made a good, quick, healthy dinner a few nights ago that I 'd like to share.  It only took 30-45 minutes to prepare from start to finish.  First, I started the roasted squash - while the oven was preheating to 450, I chopped, tossed with oil, garlic powder, salt and pepper and then roasted for about 20 minutes (flipped half way through).


Next, I started the chicken -  I sliced an onion and crushed 3 cloves of garlic then cooked in a heated  sauté pan for a few minutes.  Then I added the chicken (I used 3 large breast and sliced them in half) and four slices of bacon (diced), turning after the chicken browned a little.  Next I added 8oz (pre) sliced mushrooms, 1/2 teaspoon oregano, 1/2 teaspoon italian seasoning, salt and pepper, a can of fire roasted diced tomatoes, artichoke hearts, and about 1/2 cup of sun dried tomatoes (the dried ones not the ones in oil). I covered it and let it cook for about 20 minutes.  While it was cooking I made a box of whole wheat couscous.  Quick, easy and yummy!


Wednesday, August 8, 2012

Not your average burger and fries

For tonights dinner, I made greek burgers, tabouli salad and sweet potato fries.  My husband loves these burgers but it can be a little work to put them together.  Well, not the burgers themselves but the sauces.  The burgers are made of turkey, box of spinach, 1/4lb feta cheese and seasonings (oregano, salt and pepper, to taste).  The burgers come with two sauces.  The first is made up of two roasted red bell peppers, kalamata olives (about 15), and a hand full of fresh parsley leaves - blend it all up in a food processor until smooth, season with salt and pepper and then refrigerate. The other sauce is a cup of yogurt, a clove of garlic, half of a seedless (or English) cucumber, a teaspoon of oregano, salt and pepper blended in a
 food processor.  Ok, the sauces aren't complicated either but it is just annoying having to make one then wash the food processor bowl then make the other and then wash it again.  Whatever.

You can grill the burgers or make them in a sauté pan.  I usually prefer burgers grilled but these don't stay together that well, so I make them on the stove.  Once the burgers are done, slather the delicious sauces on each half of the bun, add the burger and then top a salad made up of arugula, tomato slices, red onion slices, cucumber slices and lemon juice and olive oil.  These burgers are worth the effort - really, really yummy!

I made homemade tabouli to go with the burgers and fries. The most time consuming part of this recipe is mincing the parsley.  Be smart  and use a chopper or something.  I insist on doing it by hand.  I'm crazy like that.  Doing it by hand takes a long, long time. I used quinoa (1 cup) instead of bulgur because I had it on hand.  I chopped up two large tomatoes, 1 1/2 cucumbers, 3 or 4 green onions, a cup of fresh minced parsley, 1/2 cup of fresh minced mint.  I mixed it all together and topped with 6 tablespoons each of lemon juice and oil mixed together.  Last step is to season with salt and pepper then refrigerate until chilled.

I totally cheated with the sweet potato fries.  I bought a bag and baked them in the oven.  Dinner is done!


Isn't that pretty?

Monday, August 6, 2012

Merci St Tropez!

We went out to dinner in Carmel by the Sea last weekend.  We changed plans at the last minute and decided to visit a restaurant  called Le St Tropez.  I was a little worried since I am one of those freaks that researches restaurants and reads thousands of reviews before stepping foot in the door.  All I knew about this place was that it was French and close by.  Oh dear.

Luckily, it was wonderful.  I mean really, really wonderful.  We had our almost four year old daughter with us and we've heard that children are frowned upon at most nice restaurants in Carmel.  Not this place!  They not only had a kids menu but they chatted with my daughter and made us feel very welcome.  The kids menu was not the typical kids menu either.  It did have some of the junk you find on all kids menus across America - pizza, chicken nuggets, hamburgers- but it also had nice, French dishes.  We ordered her crepes with chicken, bacon, and mushrooms.  It came with some wonderful vegetables on the side and it was delicious! (Of course I sampled it, I had to be able to blog about it :) She ate almost the entire thing and it was not a small portion!  They offered to bring it out as soon as it could be prepared, rather than wait to bring it out with our entrees (another kid-friendly thing to do).

But let's talk about the rest of the dinner.  Oh. My. Goodness!  Seriously, almost every dish was out of this world delicious!  Anyone in the local area should definitely put this on your list of places to eat!


First there was the appetizer.  There were lots of good choices and after some deliberation we went with escargot with brioche served with pernod scented garlic butter. Freakin delicious!  I wanted to lick the plate to finish all the garlic butter but I controlled myself (barely).   We also had a delicious basket of bread that I did use to dip into the crack garlic butter.  Actually that may have been what saved me from licking the plate.


Next we each ordered a salad.  My hubby went with the salad that had watermelon and feta.  It was really good.  I had a deconstructed Caesar salad that was good but had waaaaay to much dressing on it.  LOOK at all the dressing on that salad!!!  Does anyone eat that much dressing???  Hubby made the better choice on the salad course.  Hubby 1, me 0.


Entree round totally went to me, but truly there were no losers this round.  I ordered the veal sweetbreads (in case you didn't know sweetbreads are a very nice word used to describe veal thymus gland, because who would order that off the menu??).  I had never had sweetbreads and I've been on the lookout for a nice place to order it to increase my culinary repertoire.  It was served with polenta and a mushroom cream sauce.  I'm telling you, I had no idea that thymus gland could taste so good!  I think I actually get 2 points for that round because it was so delicious and I was able to mark it off my 'to try' list of foods. Hubby 1, me 2!!!

Finally for dessert, we went with the soufflé for two - one traditional Grand Marnier (my hubby) and one chocolate (duh).  Mine was way better because you can almost never go wrong with chocolate.

So, I won, of course.  Not just because I ordered better dishes but because I was able to have a wonderful night out with my two favorite people in the world!

Wonderful dinner, great service, kid friendly.  We will go again before leaving California.  LOVED it!


Friday, August 3, 2012

Tilapia Meuneire, Mushroom Risotto and Green Beans with Carmelized Shallots

Last night we had some good friends over for dinner.  Since it was a weeknight, I wanted to do something kind of simple.  I came up with  the titled menu.  The Tilapia was really easy - just dredge it in seasoned flour and pan fry it until golden brown on each side.  Then melt some butter in the pan until it gets frothy and top each filet with lemon juice, freshly minced parsley and butter.  Delicious and easy!!  Mushroom risotto is easy but you have to stay by the stove while cooking it.  No problem!  I had a nice glass of white wine (which I had to open since it was going in the risotto) while I stirred away.  The green beans and caramelized shallots is one of my favorite side dishes.  It looks so pretty and tastes phenomenal! (Can you believe I forgot to take a picture of the finished dish???!!)  I always feel weird about taking photos of my dishes when we have guests.  LOL!  This dish isn't difficult and I got it started earlier in the day.  I blanched the green beans in salted boiling water for about 6 minutes then shocked them in ice water to stop the cooking.  Drained them and put them in the fridge until needed.


The shallots I started a couple of hours ahead of time.  They take about 15-20 minutes to get a good brown caramelization on them and they fill the entire house with a wonderful smell.  Once everything else was done, I just reheated the green beans and shallots until nice and hot.


It was a wonderful dinner with good friends and conversation.  We finished off the night with some chocolate almond cake (with a raspberry glaze).  I love cooking for friends, especially friends who appreciate a good meal.  I was even asked to give cooking lessons!!


Petitchef

All recipes are on Petitchef